
Create HTTP load balancer
Overview
Use F5 Distributed Cloud Console to create an HTTP or HTTPS load balancer.
Types of load balancers
You can create the following types of load balancers:
- HTTP load balancer
- HTTPS load balancer with your own TLS certificate
- HTTPS load balancer with an automatic TLS certificate (minted by F5 Distributed Cloud)
In addition, you can also:
- Create and advertise an HTTP load balancer
- Create and advertise an HTTPS load balancer with your TLS certificate or with the certificate minted by Distributed Cloud
Note: Distributed Cloud supports automatic certificate generation and management. You can let Distributed Cloud DNS manage your zone (Create Primary Zone), or you can add the CNAME record to your DNS records. See Automatic Certificate Generation for certificates managed by Distributed Cloud.
Before you begin
Before you begin, you must have:
-
A Distributed Cloud account. If you do not have an account, see Get Started with Distributed Cloud Console.
-
A valid DNS domain managed by Distributed Cloud DNS in case you want Distributed Cloud to act as domain name server (DNS) or a CNAME entry in your DNS zone file. For instructions on how to set up Distributed Cloud DNS for your domain to Distributed Cloud, see Create Primary Zone.
-
A Distributed Cloud Customer Edge (CE) Site for deploying your applications. If you do not have a CE, create one using the Customer Edge Deployment guides. See the vK8s Deployment guide for deploying your applications on the Distributed Cloud network cloud or edge.
Create load balancer
Use the configuration form to add an HTTP or HTTPS load balancer.
Step 1: Open configuration form.
-
Log in to Distributed Cloud Console.
-
Select Multi-Cloud App Connect.
-
Select Manage > Load Balancers > HTTP Load Balancers.
-
Confirm the correct namespace is selected.
-
Select Add HTTP Load Balancer.
Step 2: Configure metadata and domain information.
-
In the Name field, enter a name for the load balancer.
-
Optionally, select a label and enter a description.
-
In the Domains field, enter a domain name. You can use wildcards to catch prefixes and suffixes.
-
Select Add to add more domains, if needed.
Step 3: Configure VIP advertisement.
From the VIP Advertisement drop-down menu, select an option:
-
Internet: Default option. Advertises the load balancer on a public network using the default IPv4 VIP.
-
Internet (Specified VIP): Advertises the load balancer on a public network using an F5-provided IPv4 IP address (as the VIP). Use the Public IP list to select the IP address.
-
Custom: Advertises the load balancer on specific CE sites, RE sites, virtual sites, or network segments.
-
Do Not Advertise: Doesn't advertise the load balancer on the public Internet.
Note: If you've set Internet VIP on the AWS cloud CE Site to allow clients to access load balancer VIP directly from the Internet, set the VIP Advertisement selection to Custom, and then configure the custom VIP advertisement to advertise on a Site or Virtual Site with Site Network set to Outside Network with Internet VIP or Inside and Outside Network with Internet VIP. For more information, see Create AWS Site.
Step 3.1: Configure VIP advertisement.
-
Select Custom.
-
Select Configure.
-
Select Add.
-
From the Select Where to Advertise menu, select an option for where to advertise the load balancer.
-
For the Site option:
- From the Network drop-down menu, select a network type to use on the site.
- Select a Site Reference object from the drop-down menu.
- Optionally, toggle the Show Advanced Fields option and enter an IPv4 address or an IPv6 address to use as the VIP on the site.
-
For the Virtual Site option:
- From the Network drop-down menu, select a network type to use on the site.
- Select a Site Reference object from the drop-down menu.
-
For the Virtual Site (Specified VIP) option:
- From the Network drop-down menu, select which network to use on the site.
- Select a Virtual Site Reference object from the drop-down menu.
-
For the vK8s Service Network on RE option:
- From the RE or RE Virtual Site list, select whether to an RE or RE virtual site reference object.
- Select the reference (RE or virtual site) from the Reference drop-down menu.
-
For the Virtual Network option:
- Select a network reference from the Network drop-down menu.
- Select Default V4 VIP or Specific V4 VIP from the Select V4 VIP drop-down menu. If you select a specific one, enter it.
- Select Default V6 VIP or Specific V4 VIP from the Select V6 VIP drop-down menu. If you select a specific one, enter it.
-
For the Segment on Site option:
- Select a segment from the Segment drop-down menu.
- Select a CE Site from the Site drop-down menu.
- Enter the IPv4 VIP address.
- Optionally, toggle the Show Advanced Fields option and enter an IPv6 VIP address.
-
For the Segment on Virtual Site option:
- Select a segment from the Segment drop-down menu.
- Select the virtual site reference from the Virtual Site Reference drop-down menu.
- Enter the IPv4 VIP address.
- Optionally, toggle the Show Advanced Fields option and enter an IPv6 VIP address.
Step 3.1: Set the listen port.
The load balancer uses a listen port or port range to monitor for and accept incoming requests.
The following ports aren't supported for advertising on a Distributed Cloud CE Site:
-
K8s node port range 28000-32767
-
Distributed Cloud port range 65000-65535
-
10249
-
10250
-
10251
-
10252
-
10256
-
10257
-
10259
-
1067
-
18091
-
18092
-
18093
-
18095
-
22
-
22222
-
2379
-
23790
-
23791
-
2380
-
23801
-
23802
-
323
-
4500
-
500
-
53
-
5355
-
6443
-
68
-
8005
-
8007
-
8087
-
8443
-
8444
-
8505
-
8507
-
9007
-
9090
-
9153
-
9999
-
From the Listen Port Choice list, select an option:
- Use Default Listen Port: Uses the default port. Port 80 for an HTTP load balancer and 443 for an HTTPS load balancer.
- Listen Port: Uses a specified port.
- Listen Port Ranges: Uses a specified port range.
-
Select Apply to save the VIP configuration. Then select Apply to save the Custom Advertise VIP Configuration.
Step 4: Set load balancer type.
-
From the Load Balancer Type drop-down menu, select an option.
-
Select HTTP to add an HTTP load balancer.
-
Select HTTPS with Automatic Certificate to add an HTTPS load balancer with an automatic TLS certificate.
-
Select HTTPS with Custom Certificate to add an HTTPS load balancer with your custom TLS certificate.
-
Important: Don't add both wildcard and top-level domains (for example,
*.example.comandexample.com) if you're using an automatic certificate for different load balancers. When looking at the Status or Global Status for a load balancer, statusObject is visible only when the certificate is type HTTPS with Automatic Certificate.
HTTP
If you select HTTP, select whether to have Distributed Cloud manage your DNS records with Automatically Manage DNS Records. This option requires you to have a primary zone set up in Distributed Cloud DNS.
HTTPS with Automatic Certificate
Note: If you created a DNS Zone for a domain for an AWS CE, and advertise that CE using a virtual IP address (Internet VIP), an automatic certificate is generated. Not available on other types of deployed CE sites.
-
If you're using HTTPS with Automatic Certificate, use the TLS Security Level drop-down menu to select the TLS level you want to use.
-
Optionally, redirect HTTP traffic to HTTPS with HTTP Redirect to HTTPS. Add an extra response header with Add HSTS Header.
-
From the TLS Security Level list, select the level of security to use. Options are high, medium, low, or custom. For Custom, select a minimum and maximum TLS version. Then select the Cipher Suites from the list. Use Add to add more than one.
-
From the HTTP Protocol Configuration list, confirm the HTTP protocols used for downstream connections. Default option is HTTP/1.1 and HTTP/2.
-
Optionally, turn on the Show Advanced Fields option.
-
From the Mutual TLS drop-down menu, select Enable or Disable:
-
Copy the CA certificate information into the box using the PEM or Base64 options.
-
Check the Client Certificate Optional checkbox if you want the client certificate check to be optional. If the client certificate is available, it will be verified and the connection will be terminated if verification fails. If the client certificate is absent, the connection is accepted.
-
From the Verify client certificate with CR menu, select CRL to have the client certificate verified against the CRL, and then select the CRL.
-
From the Add X-Forwarded-Client-Cert Header menu, enable the adding of an X-Forwarded-Client-Cert (XFCC) proxy header to send client certificate details to the origin. You can choose to send the entire certificate, a single field, or multiple fields using the following: By, Hash, Cert, Chain, Subject, URI, and DNS.
-
-
From the Server Response Header drop-down menu, select an option for the server response header. The following options are supported:
-
Default: Specifies that the response header name is server, and the value is volt-adc.
-
Modify header value: Specifies that a custom value is added to the existing server header. Overwrites the existing values, if any, in the server header.
-
Append header value: Specifies that a custom value is added to the server header if no value is present. If there is an existing server header value, this option doesn't overwrite the value. Enter a header value in the Append header value field.
-
Do not modify: Specifies that the existing server header is passed as is. If no server header is present, no header is appended.
-
-
From the Path Normalization menu, select an option.
HTTPS with Custom Certificate
-
If you're using HTTPS with Custom Certificate:
-
Optionally, redirect HTTP traffic to HTTPS with HTTP Redirect to HTTPS. Add an extra response header with Add HSTS Header.
-
Use the TLS Configuration drop-down menu to select between TLS Certificates or Inline Certificate (legacy) options.
-
Select Configure.
-
From the TLS Security Level list, select the level of security to use. Options are high, medium, low, or custom. For Custom, select a minimum and maximum TLS version. Then select the Cipher Suites from the list. Use Add to add more than one.
-
From the Certificates drop-down menu, select your custom certificate. Use Add upload a new one:
-
Enter a Name.
-
Under Certificate, select Import from File. From the side dialog window, select Upload File. Locate your file and then select Import from File.
-
From the OCSP Stapling choice drop-down menu, select an option.
-
If you have an intermediate chain, select Add from the Intermediate Certificate Chain drop-down menu. Then upload the intermediate chain the same way you uploaded the custom certificate. You can add more than one certificate using the Add option. However, only one certificate per encryption type (such as RSA and EC-DSA) is supported.
-
Select Add TLS Certificate.
-
Tip: To paste your certificate instead of importing it from a file, see Enable TLS on a Load Balancer
- Select Apply.
-
-
From the HTTP Protocol Configuration list, confirm the HTTP protocols used for downstream connections. Default option is HTTP/1.1 and HTTP/2.
Step 4.1: Set the listen port.
From the HTTP Listen Port Choice list, set the listen port. Default port is 80 for HTTP and 443 for HTTPS. To add port ranges, select Port Ranges and then enter the ranges. For a range of ports, enter a list of non-overlapping port ranges with a maximum of 64 ports in the list. For example, "443,100-120,8080,9080-9089".
Step 5: Configure origin pools.
-
In the Origins section, select Add to create an origin pool.
-
Toggle on the Show Advanced Fields option.
-
From the Select Origin Pool Method menu, select an option for a simple origin pool or a custom cluster:
-
Origin Pool: From the Origin Pool drop-down menu, select an origin pool. To create a new origin pool, select Add. See instructions at Origin Pools.
-
Custom Cluster: From the Custom Cluster menu, select the cluster to use.
-
-
In the Weight field, set the numeric value.
-
In the Priority field, set the numeric value.
-
Select Apply.
Step 5.1: Optionally, configure origin server subset rules.
Origin server subset rules provide the ability to create match conditions on incoming source traffic to the HTTP load balancer using country, ASN, regional edge (RE), IP address, or client label selectors for subset selection of destination (origin servers).
As prerequisites, create a label (key-value pair). In origin pool configuration, add labels to one or more origin servers. Then in the Other Settings subsection, select Enable Subset Load Balancing. Add one or more keys to origin server subset classes. Select a setting for subset fallback policy. The default option selects any origin server.
-
Toggle on the Show Advanced Fields option.
-
Under Origin Server Subset Rules, select Configure.
-
Select Add.
-
In the Name field, enter a name for the rule.
-
From the Action field, select Add Label and select the same label(s) that you assigned to origin servers in the origin pool configuration.
-
Optionally, select a country from the Country Codes List menu.
-
From the Client Selector Match menu, select an option to match on label selectors.
-
From the Source IPv4 Match menu, select an option to match on client IP address.
-
From the Source ASN Match menu, select an option to match on client ASN.
-
In the Regions Edges section, select Add to select an RE to match traffic to.
-
After you finish, select Apply.
Step 6: Configure route rules.
-
In the Routes section, select Configure.
-
Select Add.
-
From the Route Type menu, select an option:
- Simple Route: matches using a path or HTTP methods to forward the matching traffic to configured origin pools.
- Redirect Route: matches using a path or HTTP methods to redirect the matching traffic to a different URL.
- Direct Response Route: matches using a direct route on path or HTTP methods to respond to matching traffic.
- Custom Route Object: matches using a custom route.
Simple route
-
Select a method from the HTTP Method menu.
-
Select the type of path match for the Path Match menu.
-
Add a path prefix in the Prefix field. You can also configure specific origin pools or headers using the Add options in the Origin Pools and Headers sections.
-
From the Host Rewrite Method menu, select an option to specify how the host header is modified during forwarding.
-
Select an option from the Query Parameters drop-down menu.
-
In the Advanced Options field, select Configure to set advanced settings for each route.
-
For Request/Response Manipulation: Request/response manipulation allows you to manipulate the request and response headers available in the HTTP load balancer:
-
Disable Rewrite: No modifications made to the path portion of the HTTP request. Select this option if you don't want to alter the original request path.
-
Enable Prefix Rewrite: The matched prefix (or path portion) is replaced with the specified value when the request is forwarded. Select this option to set a prefix to replace part of the original path and enter the desired value in the associated field.
-
Enable Regex Rewrite: This option uses regular expressions to identify patterns in the incoming path. Matches are replaced with the configured substitution value. Select this option if your requirements include a more advanced path rewriting based on patterns.
-
Add Request Headers: This section allows you to manage headers attached to incoming HTTP requests. Select Add to add a request header rule. Enter the name of the header and the value you want to add or modify. For example, you can add a header
X-Custom-Headerwith valueCustomValue. Ensure that you save any modifications made.
Note: If you're the admin, you can insert custom request headers to the requests going to origin servers (or clients). The values for these HTTP headers can be constructed using regex, variables, and static strings. You can also chain multiple regex, variables, and static strings. For example, you can insert a header with the name
new-req-headerwith the value"$[request_header_Host]---proto:$[protocol]-anydummystring". So, for an HTTP request with the"Host:f5.com"header, the request header"new-req-header: f5.com---proto:http-anydummystring"is inserted.-
Add Response Headers: This section allows you to control headers included in the outgoing HTTP responses. Select Add to create new rules for response headers. Specify the header key and the value you want to include or modify in the outgoing response. For example, you can add a header
X-Cache-Statuswith valueHit. Save any modifications made.
Note: If you're the admin, you can insert custom response headers to the responses going to origin servers (or clients). The values for these HTTP headers can be constructed using regex, variables, and static strings. You can also chain multiple regex, variables, and static strings. For example, you can insert a header with the name
new-resp-headerwith the value"$[response_header_transfer-encoding]---proto:$[protocol]-anydummystring". So, for aHTTP/1.1response with the"Transfer-encoding: chunked"header, the response header"new-resp-header: chunked---proto:HTTP/1.1-anydummystring"is inserted. -
-
For Miscellaneous Options: The retry policy allows you to specify when and how to retry based on the response code. You can select any of the following policies from the Select Retry Policy menu:
-
Use Default Retry Policy: The default Retry Policy is
1 retrydone on the condition of5xx, which means one retry is performed if the upstream server responds with any 5xx response code or if it fails to respond (timeout, disconnect, and more). -
Do not retry: Select this option if you do not want to configure a retry policy.
-
Custom Retry Policy: Select this option to configure a custom retry policy by providing values for:
-
Retry Condition: Specifies the condition when a retry must occur. You can select multiple conditions from the drop-down. For more information on the retry conditions, see Retry Policies.
-
Number of Retries: Specifies the allowed number of retries.
-
Per Try Timeout: Specifies the timeout for the retry in milliseconds.
-
Status Code to Retry: Specifies the HTTP status codes that must trigger a retry in addition to those specified by the retry conditions.
-
Base Retry Interval: Specifies the base time interval between retries.
-
Maximum Retry Interval: Specifies the maximum time interval between retries in milliseconds. This is an optional parameter. However, if you configure a value, ensure that it is greater than or equal to the Base Retry Interval. The default value is 10 times of the Base Retry Interval.
-
Note: Ensure that the Per Try Timeout is greater than or equal to the max response time for an HTTP request, and the Routes Timeout is greater than or equal to No of Retries. When only
retriable-status-codesis specified in Retry Condition, the retry is done only when the origin server returns any of the response codes configured underretriable-status-codes. If the origin server does not respond and timeout happens after the Per Try Timeout, then the retry is not attempted, as there is no response code from the origin server. -
-
Select Apply.
-
Select Apply again.
Redirect route
-
Select method for HTTP Method and a path for the Path Match field.
-
Add a path prefix in the Prefix field.
-
Configure the Redirect Parameters for Protocol, Host, Redirect Path for redirect URL, and Response Code.
-
Select an option from the Query Parameters drop-down menu.
-
Select Apply.
-
Select Apply again.
Direct response route
-
Select a method for HTTP Method and a path for the Path Match field.
-
Add a path prefix in the Prefix field.
-
Select the Configure option in the Direct Response field. Enter a response code and response body, and then select Apply.
-
Select Apply again.
Custom route object
-
Select a route object from the Reference to Custom Route list. For information, see Create and Advertise Virtual Host.
-
Confirm if the default options are correct for the Caching and Route Activation State lists.
-
Select Apply.
-
Select Apply again.
Configure additional options per route.
-
Under Advanced Options, select Configure.
-
From the Hash Policy Choice menu, select an option.
-
Optionally, configure the Origin Servers Subsets option.
-
Under CSRF Policy, select Configure. From the Allowed Domains (Source Origin) menu, select an option. For Specified domains, enter the specific domain name. Select Apply.
-
Configure the Route Activation Status in the Route Activation section to set routes. When you disable a route, the route is skipped during request evaluation, ensuring no traffic is matched or forwarded by that rule. Disabling a route lets operators temporarily remove a route from service without changing or deleting its configuration, while all the settings are preserved for quick reactivation.
Note: You can also enable or disable routes that are already configured through the Routes page.
-
Select Apply to add the route. Select Add to add more routes.
-
To set up path-based routing, see How to Set Up Custom Routing.
Step 7: Configure caching policies.
You can configure caching policies to control how content is stored and retrieved from the content delivery network (CDN) cache.
-
In the CDN section, the following options are available:
-
Disable: No CDN caching configuration is applied to the load balancer. Default option.
-
Enable: Allows you to configure CDN caching on the load balancer. For information, see one of the following documents:
-
Step 8: Configure delivery controls.
In the Common Delivery Controls section, perform additional configuration.
Step 8.1: Configure load balancing algorithm.
-
From the Load Balancing Algorithm menu, set how the HTTP/HTTPS requests are load balanced. The options include:
-
Round Robin: This option sends requests to all eligible servers in a round robin fashion.
-
Least Active Request: This option sends requests to an origin server that has least active requests set.
-
Random: This option sends requests to all origin servers randomly.
-
Source IP Stickiness: This option sends requests to all origin servers using the hash value of the source IP address.
-
Cookie Based Stickiness: This option sends requests to all origin servers using the hash value of the cookie. The cookie can be passive or generated. The consistent hashing algorithm, ring hash, is used to select the origin server. Requires you to further configure the parameters.
-
Ring Hash Policy: This option sends requests to all origin servers using the hash value of the request. Requires you to further configure the parameters.
-
-
If you select Cookie Based Stickiness:
-
In the Name field, enter a name for the cookie.
-
Optionally, set a TTL value in milliseconds and set a path name value.
-
-
If you select Ring Hash Policy:
-
Select Configure to specify a list of hash policies to use.
-
Select Add.
-
From the Hash Policy Specifier drop-down menu, select what to apply the hash policy to. The options include:
-
Cookie: Hash policies are applied to a cookie.
-
Header Name: Hash policies are applied to the name of key of the request header used to obtain the hash key.
-
Source IP: Hash policies are applied to the source IP address.
-
-
In the Name field, enter a name for the cookie that is used to obtain the hash key.
-
To apply the hash policy as a terminal policy, select Terminal.
-
Select Apply.
-
Select the newly created hash policy, and then select Apply.
-
Step 8.2: Configure the trusted client IP headers.
When trusted client headers are set, the system uses the real client IP address as the source IP address, instead of the proxy's IP address. The following apply when configuring trusted client IP headers:
-
When multiple headers are configured, F5 Distributed Cloud platform follows top to bottom precedence. This means initially first header is considered and system checks for its availability in the request. If not present in the request, system proceeds to check for the second header, and so on, until one of the listed headers is found.
-
When none of the configured headers exists, or the value of the configured header is not an IP address, then the source IP of the packet is used.
-
When multiple IP addresses are available in the header value, the system reads the rightmost IP address, and considers it as real client IP address. However, when using the
X-Forwarded-Forheader, and if multiple IP addresses are available in value, the system reads the rightmost-1 IP address, and considers it as real client IP address.
Note: See Overview of Trusted Client IP Headers in F5 Distributed Cloud Platform for more information.
-
Select the Enable from the Trusted Client IP Headers drop-down menu.
-
Use Add to add one or more headers. The headers are processed in the numerical order they are added, as shown on the page.
Step 8.3: Configure location and other options.
-
Select the Add Location checkbox to specify the regional edge (RE) site name in the header responses.
-
Select Configure in the More Options field and perform the configuration:
-
In the Header Options section, add details in each of the request headers and response headers fields to specify add and remove headers accordingly:
-
Add Request Headers: This section allows you to manage headers attached to incoming HTTP requests. Select Add to add a request header rule. Enter the name of the header and the value you want to add or modify. For example, you can add an
X-Custom-Headerheader with a value of CustomValue. Save any modifications made.
Note: If you're the admin of the HTTP load balancer, you can insert custom request headers to the requests going to origin servers (or clients). The values for these HTTP headers can be constructed using regex, variables, and static strings. You can also chain multiple regex, variables, and static strings. For example, you can insert a header with the name
new-req-headerand value"$[request_header_Host]---proto:$[protocol]-anydummystring". So, for an HTTP request with the"Host:f5.com"header, the request header"new-req-header: f5.com---proto:http-anydummystring"is inserted.-
Add Response Headers: This section allows you to control headers included in the outgoing HTTP responses. Select Add to create new rules for response headers. Specify the header key and the value you want to include or modify in the outgoing response. For example, you can add a header
X-Cache-Statuswith a value of Hit. Ensure that you save any modifications made.
Note: If you're the admin of the HTTP load balancer, you can insert custom response headers to the responses going to origin servers (or clients). The values for these HTTP headers can be constructed using regex, variables, and static strings. You can also chain multiple regex, variables, and static strings. For example, you can insert a header with the name
new-resp-headerwith the value"$[response_header_transfer-encoding]---proto:$[protocol]-anydummystring". So, for an HTTP/1.1 response with the"Transfer-encoding: chunked"header, the response header"new-resp-header: chunked---proto:HTTP/1.1-anydummystring"is inserted. -
-
In the Configure Error Response Options section, select Configure to customize error responses.
-
In the Miscellaneous Options section, select Configure. Complete the configuration options.
-
-
Select Apply.
Step 9: Configure WAF settings.
In the Web Application Firewall section, configure your WAF. Use an existing WAF, or add a new one for your load balancer. For new WAFs, you can have your load balancer configured to exclude specific WAF rules from processing certain requests.
-
From the Web Application Firewall (WAF) drop-down menu, select whether to add a WAF for the load balancer. If you select Enable, use the Enable drop-down menu to select an existing WAF. Or, select Add and then follow the WAF how-to guide.
-
From the WAF Exclusion list, select Inline Rules to use on a single load balancer or WAF Exclusion Policy to use on multiple load balancers. Select Configure. For more information, see Create WAF Exclusion Rules.
Tip: You can also add App Firewall per route. In the route configuration, for Simple Route, go to advanced options configuration, go to security section, and select App Firewall for the Web Application Firewall (WAF) field. Select an App Firewall object. By default, the route inherits the App Firewall configured for the load balancer.
-
Select Configure in the Data Guard Rules section and follow the instructions at Configure Data Guard to set data guard rules.
-
Select Configure for the Cross-Site Request Forgery Protection option. Specify allowed domains in the Allowed Domains (Source Origin) field in the CSRF protection page, and select Apply. You can configure to allow all load balancer domains or set specific domains to the allowlist.
Tip: You can verify the CSRF mitigation in the load balancer security monitoring page. The CSRF mitigation event is displayed as a Service Policy event. Expand the security event's JSON view. The sec_event_name field with value CSRF Policy Violation indicates that CSRF mitigation is active. For more information, see Monitor HTTP Load Balancer.
-
To configure the settings for GraphQL inspection:
-
Under the GraphQL Inspection section, select Configure.
-
Select Add.
-
In the Name field, enter a name for this message.
-
From the Domain drop-down menu, select an option that corresponds to your domain setting. Default value is Any Domain. You can select an option match by Exact Value or Suffix Value.
-
From the Path drop-down menu, select an option for the location of your GraphQL server endpoint. Default value is /graphql.
-
From the HTTP Method drop-down menu, select an option that specifies the method used to access the GraphQL endpoint server.
-
In the GraphQL Settings section, perform the following:
-
From the Maximum Total Length menu, enter a value to specify the maximum total length in bytes for a query.
-
From the Maximum Structure Depth menu, enter a value to specify the maximum depth for a query.
-
From the Maximum Batched Queries menu, enter a value to specify the maximum number of single batch queries.
-
From the Introspection Queries menu, select whether to turn on introspection of GraphQL schema.
-
-
Select Apply to save settings.
-
Select Apply to apply settings to load balancer configuration.
-
-
Optionally, in the Cookie Protection field, select Configure to add attributes to an HTTP response cookie that's sent to the client:
-
Select Add.
-
In the Cookie Name field, enter a name for this cookie. Wildcards and regular expressions (regex) aren't supported. Use the exact cookie name.
-
From the SameSite menu, select if or how the new cookie is sent with same-site and cross-site requests. Select from:
- Ignore
- Strict
- Lax
- None
-
From the Secure menu, select whether this new cookie is sent only over an HTTPS encrypted connection to the server. Default option is Ignore.
-
From the HttpOnly menu, select whether this new cookie is inaccessible to JavaScript Document.cookie API. Default option is Ignore. Select Add to ensure the cookie is inaccessible.
-
Select Enable for the Cookie Tampering Protection field to turn on cookie tampering protection. This prevents attackers from modifying the values of session cookies.
-
Select Apply to save settings.
-
Select Apply to apply settings to load balancer configuration.
-
Step 10: Configure security controls.
In the Common Security Controls section, configure additional security options.
Step 10.1: Add service policy.
-
From the Service Policies menu, select an option for how to apply one or more service policies to this load balancer. The options are:
-
Apply Namespace Service Policies: This option applies the service policies from the namespace to this load balancer.
-
Do Not Apply Service Policies: This option does not apply any service policies to this load balancer.
-
Apply Specified Service Policies: This option allows you to apply one or more specific service policies to this load balancer.
-
-
For Apply Specified Service Policies, Select Configure to add service policies.
-
Under Policies, select Configure.
-
In the Policies list, select a service policy from the drop-down menu.
- Use Add to add more policies to the list.
-
Select Apply when you're finished building the list.
Tip: For more details, see Create Service Policy.
Step 10.2: Configure IP reputation.
The IP reputation service analyzes IP threats and publishes a dynamic data set of millions of high-risk IP addresses, to protect users from inbound traffic from malicious IP addresses. IP threat categories include spam sources, Windows exploits, web attacks, botnets, scanners, denial of service, reputation, phishing, proxy, mobile threats, and TOR proxy.
For more information, see Deny Malicious IPs Using IP Threat Categories.
Step 10.3: Configure threat mesh.
Threat Mesh provides F5 Distributed Cloud customers with an additional layer of protection against web application attacks. Threat Mesh leverages cross-customer correlation (as in, correlation of client attacks across different customers) to identify malicious intent of a client. Whenever a client is flagged due to a malicious intent by our WAAP decisions engines, that client is added to the ThreatDB.
If you turn on Threat Mesh, then the requests that come into an application from an IP address in the ThreatDB are automatically blocked by the load balancer.
Requests that are blocked due to Threat Mesh can be seen and evaluated in the Web App & API Protection workspace on the Overview > Security > Security Analytics tab for a specific load balancer and the Multi-Cloud App Connect workspace on the Overview > Applications > Security Analytics tab for a specific load balancer. Blocked requests show as a Service Policy violation in the Event Type column with Threat Mesh in the Threat Name column.
For more information, see Load Balancer Security Monitoring.
From the Threat Mesh drop-down menu, select Enable.
Step 10.4: Configure user identification.
Select a user identifier for rate limiting and malicious user mitigation. For more information, see Configure Rate Limiting.
-
From the User Identifier drop-down menu, select the method for user identification:
-
Select Client IP Address to use the user's IP address.
-
Select User Identification Policy to use the object to evaluate the identity. To create a new user ID, select Add from the User Identification Policy menu.
-
Step 10.5: Configure malicious user detection.
Malicious user detection performs user behavior analysis and assigns a risk score and threat level of low, medium or high based on the suspicious activity of the user. The risk score of the user is decayed over time, if no further suspicious activity is noticed. The feature can be configured also via external app_type and labeling this HTTP load balancer. In this case, the external app_type configuration overrides the internally disabled feature. Enabling the feature internally is allowed only when there is no labeling to an external app_type.
From the Malicious User Detection drop-down menu, select Enable.
Step 10.6: Configure malicious user mitigation and challenges.
-
In the Common Security Controls section, toggle the Show Advanced Fields option.
-
From the Malicious User Mitigation And Challenges drop-down menu, select Enable. You can configure a challenge for users detected as malicious. For the JavaScript Challenge, Captcha Challenge, and Policy Based Challenge options, you can set a challenge for all users or requests matching specific conditions. For any of these options, select View Configuration to create that challenge for users or requests that meet specific criteria.
-
From the Malicious User Mitigation Settings menu, select an option for malicious users at different threat levels:
-
Default: Applies low, medium, and high levels.
-
Custom: Defines different levels and actions to take. Select an option from the Custom menu. Or select Add to create a custom option.
-
-
From the JavaScript Challenge Parameters menu, select the type of JavaScript challenge:
-
JavaScript Challenge Parameters: You can configure a custom JavaScript challenge for this load balancer. Select Configure. Set the delay value, cookie expiration value, and custom message to use. After you finish, select Apply. For more information, see Configure JavaScript Challenge.
-
Use Default Parameters: This option sets the default challenge with no customization.
-
-
From the Captcha Challenge Parameters menu, select the type of captcha challenge:
-
Use Default Parameters: This option takes the default settings and applies them.
-
Captcha Challenge Parameters: This option allows you to define the challenge parameters. Select Configure. Set the cookie expiration value and the custom message to use. After you finish, select Apply.
-
Policy-based challenge
If you selected Policy Based Challenge, perform the following:
-
Select View Configuration.
-
Configure the JavaScript, captcha, and malicious user settings.
-
Select a challenge type.
-
In the Rules section:
-
Select Configure.
-
Select Add.
-
Enter a Name value and an optional description.
-
In the Challenge Rule Specification field, select View Configuration.
-
From the Select Challenge Action Type drop-down menu, select the challenge action to take. Disable challenge is the default setting. The two options are Enable javascript challenge and Enable captcha challenge.
-
From the Source IP Match drop-down menu, select the source IP to match the requests. The options include:
-
Any Source IP: This option allows any source IP to match requests.
-
IP Prefix List: This option provides a list of prefix values. You must provide a list of IP prefixes.
-
IP Prefix Sets: This option provides a list of references to IP prefix set objects. You must create the prefix set.
-
-
From the Source ASN Match drop-down menu, select an option for the origin Autonomous System Number (ASN) to match requests:
-
Any Source ASN: This option matches any source ASN.
-
ASN List: This option provides a list of ASN values to match requests. You must enter the ASN values.
-
BGP ASN Sets: This option provides a list of references for Border Gateway Protocol (BGP) ASN objects to match requests. You must create the ASN set.
-
-
From the Client Selection drop-down menu, select how the clients match the challenge rules. The options include:
-
Any Client: This option is for all clients to match the challenge rules.
-
Group of Clients by Label Selector: This option provides a label selector for the set of clients. You must select the expression from the list.
-
-
To configure the TLS fingerprint matcher, select Configure:
-
From the TLS fingerprint classes drop-down menu, select a class.
-
Optionally, you can add an exact value or exclude a value with Add.
-
Select Apply.
-
Optionally, you can set the parameters for the request matching from the Request Match section, and you can set an optional Expiration Timestamp from the Advanced Match section.
-
Select Apply.
-
Select Apply.
-
-
Select Apply.
-
-
Select Apply.
Step 10.7: Configure rate limiting.
Rate limiting allows you to control the rate of requests sent to your origin servers and protect against API traffic surge and denial of services attacks. For detailed instructions, see Configure API Rate Limiting.
-
To configure rate limiting, select an option from the list:
-
Disable: Default option. No rate limiting allowed for the load balancer.
-
API Rate Limit: Set rate limiting for specific API endpoints.
-
Custom Rate Limiting Parameters: Allows you to set custom parameters to rate limit.
-
Step 10.8: Configure trusted client rules.
These rules define specific clients for which WAF processing and Bot Defense is skipped. Add rules to allow trusted clients based on the match conditions configured. You can skip WAF, skip bot processing, or both. The match conditions include IP prefix, AS number, and HTTP headers to identify specific clients.
-
To configure the Trusted Client Rules option:
-
Select Configure, and then select Add.
-
Complete the configuration process to add rules to allow trusted clients and to prevent the WAF from applying the block rules you previously configured.
-
Select Apply.
-
Select the newly created rules option and then select Apply.
-
Step 10.9: Configure client blocking rules.
You can select match condition rules, such as IP prefix, AS number, and HTTP headers to identify specific clients to block from accessing your applications.
-
To configure the Client Blocking Rules option:
-
Select Configure, and then select Add.
-
Complete the configuration process to add rules to block specific clients from making requests.
-
Select Apply.
-
Select the newly created rules option, and then select Apply.
-
Step 10.10: Configure CORS policy.
The Cross-Origin Resource Sharing (CORS) policy is an HTTP-header based mechanism that allows a server to indicate any origins (domain, scheme, or port) other than its own from which a browser should permit loading resources.
-
In the CORS Policy field, select Configure.
-
To allow a specific origin server, select Add under the Allow Origin field.
-
To allow origin servers by regex, select Add under the Allow Origin Regex field.
-
In the Allow Methods field, enter information to use for the
access-control-allow-methodsheader. -
In the Allow Headers field, enter information to use for the
access-control-allow-headersheader.Important: When you turn on Bot Defense on the HTTP load balancer, Bot Defense adds the following headers to the Allow Headers field in your CORS policy:
Xa4vrhYP3Q-a,Xa4vrhYP3Q-a0,Xa4vrhYP3Q-b,Xa4vrhYP3Q-c,Xa4vrhYP3Q-d,Xa4vrhYP3Q-e,Xa4vrhYP3Q-fandXa4vrhYP3Q-z. These headers are required for Bot Defense to support requests that use CORS. -
In the Expose Headers field, enter information to use for the
access-control-expose-headersheader. -
In the Maximum Age field, enter information in seconds to cache the headers.
-
After you finish, select Apply.
Step 11: Configure L7 DoS protection.
-
From the Mitigation Action menu, select an option:
-
Block: This option blocks traffic from suspicious sources. No challenge is returned.
-
JavaScript Challenge: This option serves a JavaScript challenge to all traffic from suspicious sources. Select View Configuration to change the default settings and message for the challenge.
-
CAPTCHA Challenge: This option serves a Captcha challenge to all traffic from suspicious sources. Select View Configuration to change the default settings and message for the challenge.
-
-
Under DDoS Mitigation Rules, select Configure to open the rules list page. Use Add to add a rule:
-
In the DDoS Mitigation Rule page, set a name for the rule.
-
Select a choice for the Mitigation Choice menu. The mitigation choice can be either a list of IP addresses or combination of ASN, region, and TLS fingerprinting.
-
Select Apply to add the rule to the list of rules.
-
Select Apply to add the rules list to the DDoS protection configuration.
-
-
From the Slow DDoS Mitigation menu, select an option. For the Custom option, enter Request Headers Timeout and Total Request Timeout values.
Note: For information about monitoring and responding to an active DDoS attack, see Monitor HTTP Load Balancer.
Step 12: Configure API protection.
The API Protection section provides different API protection capabilities.
Step 12.1: API Definition.
An API definition is a structured inventory of your API (endpoints, methods, and the expected request/response structure). When you set an API definition, it establishes a reference baseline that improves API visibility, governance, and detection accuracy.
Some detection mechanisms require an API definition to operate correctly, while others use it to improve precision and reduce false positives. Although it is optional, F5 recommends that you set an API definition for your production environments.
-
From the API Definition menu, select Enable. The default value is Disable, meaning an API definition isn't used.
-
If you select Enable:
-
From the API Definition menu, select the API definition.
-
To create a new definition, select Add.
-
-
From the Validation menu, select an option to perform OpenAPI specification validation. The options include:
-
Disabled: Default option. No validation is performed.
-
API Inventory: Validate all endpoints listed in the OpenAPI specification file. Any other endpoints not listed act according to Fall Through Mode.
-
Custom List: Define API groups, base path, or API endpoints and their validation modes. Any other endpoints not listed act according to Fall Through Mode.
Note: OpenAPI Validation is a feature that ensures API traffic complies with the specified schema and can block or report non-compliant traffic. Validation can be configured on a per-endpoint, per-group, or per-base-path basis. The Fall Through Mode allows for identifying and handling Shadow APIs by either blocking, reporting, or allowing them. Allowed IP address lists can be created to pass OpenAPI Validation by specific IP addresses.
-
From the OpenAPI Validation Processing Mode menu, select whether to Validate or Skip.
-
From the Validation Enforcement Type menu, select an option to specify the type of enforcement.
-
From the Request Validation Properties menu, select one or multiple options from the following:
-
Query Parameters: The incoming requests are validated against the query parameters specified in the API definition.
-
Path Parameters: The incoming requests are validated against the path parameters specified in the API definition.
-
Content-type: The incoming requests are validated against the content-types specified in the API definition.
-
Cookie Parameters: The incoming requests are validated against the cookie parameters specified in the API definition.
-
HTTP Headers: The incoming requests are validated against the HTTP headers specified in the API definition.
-
HTTP Body: The incoming requests are validated against the HTTP body specified in the API definition.
-
-
From the Fall Through Mode menu, select an action for every request that targets endpoints which aren't in the validation list.
-
Step 12.2: Optionally, configure API protection rules.
Select Configure in the API Protection Rules field. See the Configure API Protection Rules guide for more instructions.
Step 12.3: Optionally, configure JWT validation.
This feature allows you to cryptographically verify incoming JSON web tokens (JWTs) before they are passed to origin APIs. This prevents JWT replay attacks, JWT tampering, and can block requests with expired tokens or tokens that aren't yet valid.
-
Under JWT Validation, select Configure.
-
From the Target menu, select whether to perform validation on all endpoints, specific API groups, or a specific path. Target location(Bearer) looks for the JWT token in the Authorization HTTP header with Bearer authentication scheme.
-
From the Action menu, select whether to block or report if the JWT is not valid. See the following options:
-
Report action: In monitoring mode, the request is allowed to pass through. The security event is logged.
-
Block action: The request is blocked and a 401 Unauthorized error is returned. The security event is logged.
-
-
Under JSON Web Key Set (JWKS), select one of the following options from the drop-down list:
-
Local Input: To use a JSON Web Key Set (JWKS) in JSON format, select Local Input. The keys are statically configured within the load balancer.
-
Select Configure.
-
In the text box that appears, copy and paste the JWKS used for authorization with the server.
-
Select Apply.
-
Authorization Servers: To use one or more authorization servers, select Authorization Servers.
- In the Authorization Server Name field, select an existing Authorization Server, or add a new one by configuring the JWKS URI.
-
Select Add.
-
In the Name field, enter a name for the new load balancer.
-
Optionally, select a label and enter a description.
-
In the JWKS URI field, provide the URI of the authorization server. The platform automatically fetches the JWKS from the configured JWKS URI.
-
- In the Authorization Server Name field, select an existing Authorization Server, or add a new one by configuring the JWKS URI.
Note: The JWKS refreshes every 24 hours. However, you can also fetch the JWKS manually from the list of authorization servers.
-
-
In the Reserved Claims Validation section, perform the following:
-
From the Issuer (iss) menu, select whether to match exactly the issuer’s reserved claim, or to disable this functionality. If you want to match exactly, provide the exact match value in the corresponding field.
-
From the Audience (aud) menu, select whether to match exactly the JWT pre-configured value, or to disable this functionality. If you want to match exactly, provide the exact match value in the corresponding field. You can add more than one value to match for using Add.
-
From the Validation Period menu, select Enable (default value) or Disable. Enable validates the JWT expiration and not before (
nbf) values (if present in the request token). Disable doesn't perform validation against these fields. After you finish, select Apply.
-
-
In the Mandatory Claims section, select Add. Enter the name of the claim. It must match the claim already present in the payload, in the JWT. After you finish, select Apply. If you need to delete a claim, select ... and then select Delete.
Step 12.4: Set API discovery.
API Discovery samples traffic through the load balancer to build a schema of an app's API endpoints. It can generate a swagger definition file. Having API Discovery turned on also allows detection of attacks through the API, such as BOLA and BOPLA.
-
From the API Discovery menu, select Enable to start the discovery process. The default value is Disable, meaning API discovery is not performed.
-
From the Learn From Traffic With Redirect Response menu, select whether to allow learning from redirect traffic (requests resulting in a 3xx response code).
-
In the Purge Duration for Inactive Discovered APIs field, enter the number of days for the API endpoint to live. If no 2xx responses occur from an endpoint (or 3xx if configured) occur for the span of days entered, then the API endpoint is removed.
-
Select Configure in the API repositories section to set up the API code repositories (for example, GitHub, GitLab, BitBucket, or Azure Repos) to the load balancer as the source for API endpoint discovery.
Step 12.5: Sensitive data discovery (or sensitive data policy).
You can configure a policy for for how sensitive data is detected. You can specify which privacy or compliance frameworks (PCI-DSS, HIPAA, GDPR, and others) to use when detecting sensitive data, you can disable specific sensitive data types, and you can add your own sensitive data types.
Once this feature is configured, you can see which API endpoints contain sensitive data and which API compliance framework(s) they are governed by. These APIs display on the Overview > Security page under the API Endpoints tab. Make sure the Sensitive Data and API Compliance columns are visible to see the information. There, you can also see the information by examining the endpoint details. See Explore Security Monitoring for a Load Balancer for more information on monitoring.
-
Select Default to use system defaults for sensitive data discovery.
-
Select Custom for a custom data discovery. Next select an existing policy from the Specify Sensitive Data Discovery drop-down list, or select Add in the list to create a new policy.
-
For a new policy:
- Enter a name for the policy and optionally labels and a description.
- Select one or more entries from the Compliance Frameworks drop-down list. These frameworks define the set of sensitive data types that are detected.
- For each specific sensitive data type you would like to disable (these aren't shown as sensitive in the API discovery), select Add under Disabled Built-In Sensitive Data Types and then select a data type from the drop-down list.
- To define your own sensitive data types, select Configure in the Defined Custom Sensitive Data Types section. Next, for each data type you want to add, select Add to get a blank entry in the Defined Custom Sensitive Data Types List. Select an existing entry in the drop-down list or select Add in the list to create a new one.
- For a new sensitive data type:
- Enter a name an optionally labels and a description.
- Select Configure to create the data type rules. For each rule, select Add.
- Select an entry in the Pattern Choice drop-down menu: Key Pattern, Value Pattern, or Key-Value Pattern.
- Select an entry in the Pattern drop-down menu and then enter the value or substring to match.
- Select Apply to save the detection rule and then select apply to save the rule list.
- Ensure that Mark as Sensitive Data is checked.
- Check Mark as PII if this data type is personally identifiable information (PII). This allows the system to classify discovered sensitive data appropriately.
- Select Continue to save the new data type.
- Select Apply to save the list of defined custom sensitive data types.
-
Select Continue to save the new custom policy.
Step 12.6: Optionally, configure sensitive data exposure rules.
You can specify rules to mask sensitive data in API responses.
-
Select Configure in the Sensitive Data Exposure Rules section.
-
Select Add to create the first rule.
-
In the Target section, enter the path that responds to the request. Also, enter one or more methods with responses containing sensitive information.
-
In the Values field in the Pattern section, enter the JSON field value you want to mask. For example, given the JSON below is the response:
{ "user": { "Email":"<EMAIL-EXAMPLE>", "ID":1, "altEmails":["<EMAIL-EXAMPLE>, <EMAIL-EXAMPLE>"] } }- To mask the Email value, enter user.Email.
- To mask all emails in the array altEmails, enter user.altEmails[_]. Note that an underscore between the square brackets indicates the array's elements. Masked values in the response are masked as follows: All letters changed to "a" or "A" (matching case) and all numbers converted to "1". For example:
{ "user": { "Email":"aaaa1111@aaaaa.aaa", "ID":1, "altEmails":["aaaa@aaaaaaaa.aaa, Aa.A@Aaaaaaa.aaa"] } }- To apply masking to nested objects, the exact location of the key must be specified. The masking configuration should be set as
A.B.key1orA.B.key2, depending on which value you want to mask. For example:
{ "A": { "B": { "key1": "val1", "key2": "val2" } }}-
Select Apply to save the rule to the list of Sensitive Data Exposure Rules.
-
Select Add to add more rules.
-
Select Apply to save the list of rules to your load balancer.
Step 13: Configure bot protection.
You must have Bot Defense set in your tenant as a service prior to configuring it for your load balancer.
-
Go to the Bot Protection section. From the Bot Defense menu, select an option to configure bot defense. The options are:
-
Disable: No Bot Defense configuration is applied.
-
Enable: Allows you to configure Bot Defense on the load balancer. For information, see one of the following documents:
- Bot Defense and Advanced Bundles: Enable Bot Defense on an HTTP Load Balancer.
- Bot Defense Standard: Configure Bot Defense guide to set Bot defense protection for your load balancer.
-
Step 14: Configure malware protection.
Malware protection guards against uploaded files infected with malicious content. All file types, except compressed files such as .zip, .tar, .gz, are scanned, including the following:
- Executable files (for example,
.exe,.bat,.csh) - Document files (for example,
.doc,.pdf,.xlsx) - Image files (for example,
.jpg,.png,.bmp) - Video files (for example,
.avi,.mp4,.mov) - Audio files (for example,
.mp3,.aac,.wav)
Compressed file parameters: Scanning files that exceed 5 MB in size only scans the first 5 MB. A partial scan runs to determine if the file is malicious or not.
Compressed file archive scanning options:
-
Recursion Depth Limit (2): The maximum limit you're allowed to scan nested archives. Any archives scanned over the limit two don't fully process.
-
File Count Limit (10): The maximum limit you're allowed to scan in archive during evaluation. Archives scanned over file count limit ten don't fully process.
-
Decompression Size Limit (50MB): Maximum compressed content can't exceed 50 MB. Each file over 5 MB each doesn't scan.
Note: Feature is an add-on and needs enabling in the catalog. You can allow it in a load balancer once added.
-
Select Enable from the Malware Protection drop-down menu to allow file upload scanning in real time to protect against malware.
-
Select Configure to create a list of malware detection rules.
-
Select Add to add malware detection rule.
-
Enter Name for your rule and optionally a Description.
-
In the Action drop-down menu, select what to do when a match occurs. Block denies the upload request and reports the issue. Report allows the upload request and reports the issue.
-
In the HTTP Methods drop-down menu, set which HTTP methods you want to match in this rule. You can select multiple methods.
-
From the Domain Matcher drop-down menu, select
-
Any Domain: All domains use this rule.
-
Domain: Only the domains you specify use this rule. You can specify the domains by Exact Value (only the domain that you specify uses this rule), Suffix Value (domains with your specified suffix use this rule: for example,
x.abc.comandy.abc.comuse this rule if you enterabc.com), and Regex Values of Domains (any domain that matches your entered regular expression uses this rule).
-
-
From the Path Match, enter the exact path to match.
-
Select Apply to save the rule to your rules list.
-
Select Apply to save your rules list.
-
Step 15: Configure client-side defense.
Make sure this service is turned on for your tenant. For instructions, see Client-Side Defense.
Step 16: Add the load balancer.
Select Add HTTP Load Balancer.
Verify load balancer status
Verify the status depending on where the domain is managed from.
If your load balancer is type HTTP, then it's reachable by configured domains as well as an automatically generated CNAME.
Distributed Cloud DNS-managed domain:
- Wait for the DNS Info to display VIRTUAL_HOST_READY and for Certificate status to display Valid.
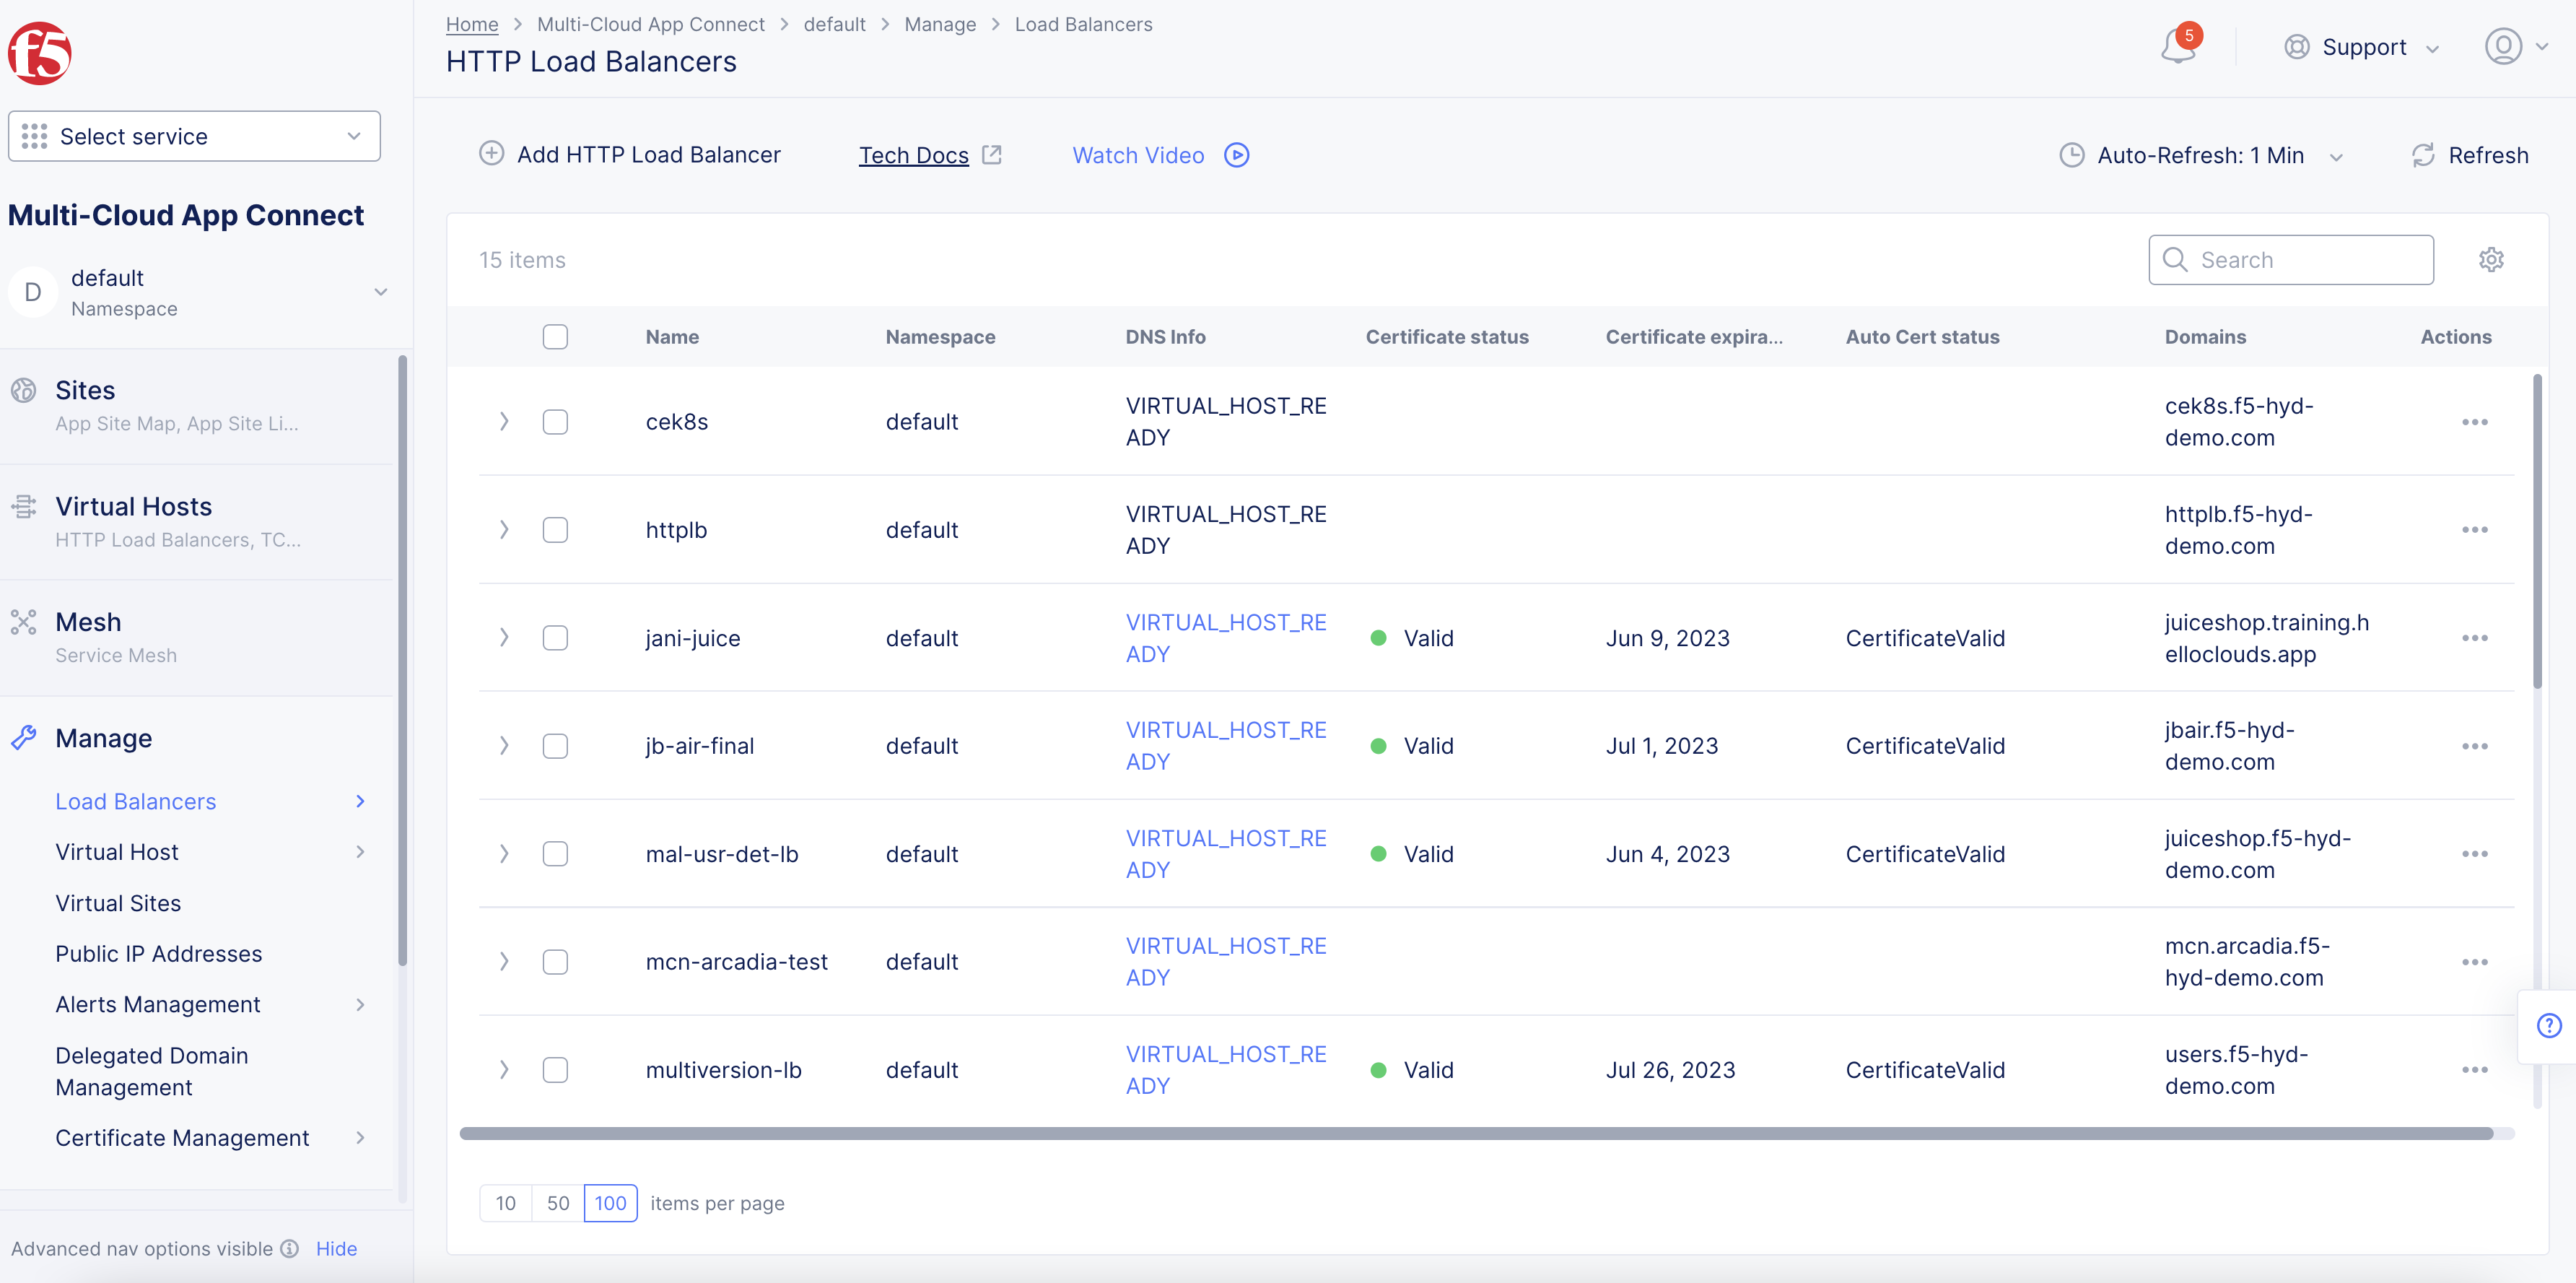
Figure: Load balancer created
- Verify that the requests to your virtual host domain are processed and load balanced between the configured origin servers.
Note: The Certificate expiration date column displays the expiration date for the certificates. Certificates managed by F5 Distributed Cloud are issued for 90 days and auto-renewed after 75 days from the date of issuance.
Non-Distributed Cloud DNS-managed domain:
-
Verify that Certificate status displays Domain Challenge Pending.
-
Select > to view the load balancer information in JSON format.
-
Verify that ACME challenge record exists under get_spec > auto_cert_info > dns_records field in the JSON information. The record name starts with _acme-challenge and the value is the name of the TXT record created by Distributed Cloud.
-
Create a CNAME record with the obtained ACME challenge name and value in your DNS server.
-
Verify that the Certificate status field value changes to Certificate Valid.
-
Verify that the Certificate expiration date field value displays the expiration date for the certificates.
Note: Some client browsers can employ a performance optimization known as "connection coalescing." In this optimization, if two host names resolve to the same IP address and are present in the same TLS certificate, the HTTP/2 connection is reused between them. This can land the HTTP request in the wrong load balancer and results in a 404 error. See HTTP2 RFC for more information.
References
For more information, see:
API References
For API information, see: